pornspective.ai
So you want to use the latest in computer vision, machine learning and artificial intelligence to make sense of your porn collection and auto tag? Look no further than pornspective.ai.
This additional application from the Pornspective suite has been purposely developed to use the most advanced algorithms in computer vision. Pornspective’s custom trained porn AI model will detect around twenty key attributes from your videos. Applying further intelligent logic to the AI detection, pornspective.ai will then suggest what it has found in the video. The results can then be mapped to pornspective.v2 for automatic tagging. Cool hey!
Step 1: Set up pornspective.v2!
To start it is recommended you have pornspective.v2 already setup and running with some content, otherwise pornspective.ai will produce some pretty results but not deliver the outcome it was intended for – auto tagging your v2 collection!

Step 2: Installing pornspective.ai
Install the pornspective.ai application using the standard Windows installer which will take you step by step through the installation process and finally leave an icon on your desktop to launch pornspective.ai. The beauty of it being a separate application means you have flexibility as to where to install it, either on the same machine as v2, or on a dedicated machine sat on the network elsewhere.
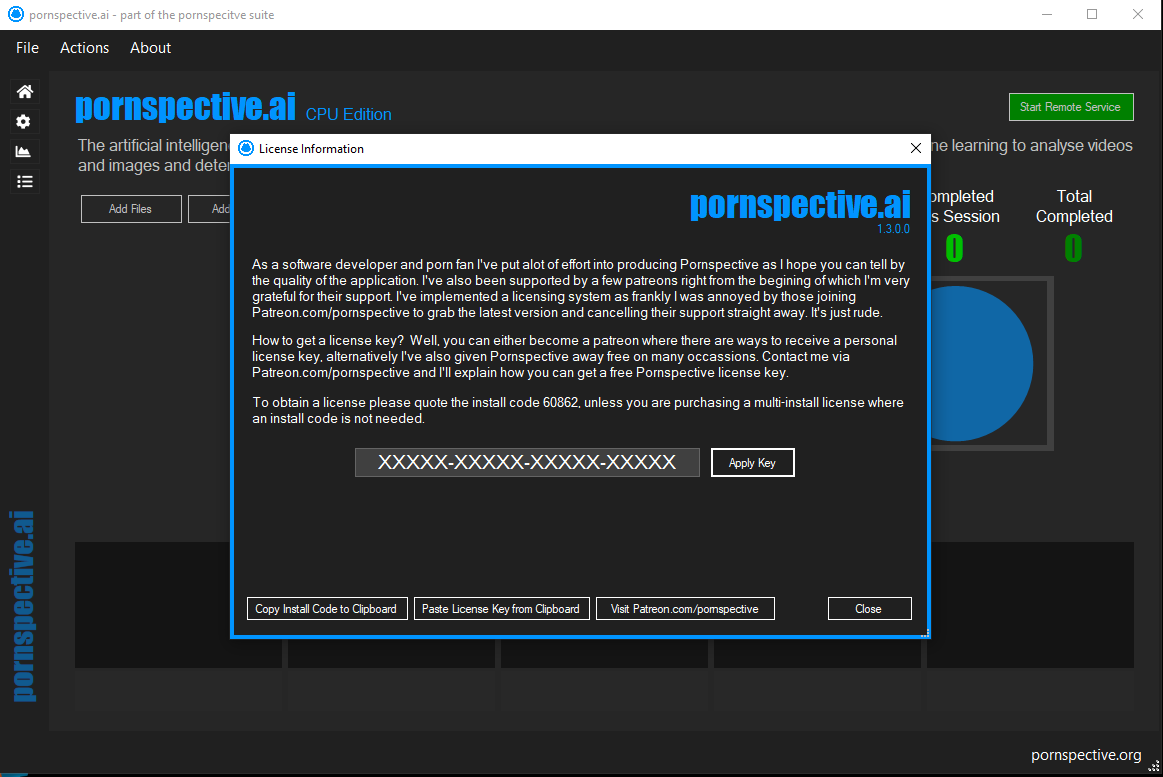
Step 3: License Keys
When you launch pornspective.ai for the first time you’ll receive a license key window, similar to the v2 launch. Paste a valid key in (these will be shared in the Welcome notes when you subscribe to my Patreon/pornspective supporters page). The application will confirm the key is okay and restart. Now you’re ready to configure.
Configurating and Using your AI
So let the fun begin. First we have to configure the application, then we’ll try a few sample videos and walk through how to review the results.

1: Configuration
Click the Configure (“cogs icon”) on the left side navigation bar. This will show the configuration screen. Here you’ll need to decide on how much you want the application to scan your videos and where to put the results. The following gives a description of the settings :-
Result Folder
This is where pornspective.ai will drop the thumbnails for the videos, it is also the place where it will drop edited thumbnails highlighting what was found in the AI detection. For every video a folder will be created with these images stored in that folder. You will need to delete the contents periodically depending on how much space you have.
AI Confidence
This is normally set to 40%, anything under 40% confidence will be totally ignored. Anything above 40% will be processed with the additional logic. Recommend this is kept at 40% but increase if you have too many wrong detections.
Thumbnail Size
Don’t worry about this having the correct aspect ratio, default is 640×640 which is normally plenty of resolution for the AI to detect. The actual model has been trained on images of the same size so it is recommended you keep it to this size. If you leave both at 0 then the image will be the actual video size. This will give you high resolution images but doesn’t necessarily mean better AI.
Percentage Based Frequency
Here you can choose to detect at set percentages through the video. For example start at 5% into the video and take a screen shot every 1% until you get to 5% of the end. This will generate 90 images regardless of the length of the video.
Timed Based Frequency
Time based is recommended as this will take a screenshot at regular timed intervals and will generally yield much better results as you can suggest 15 seconds between each detection for example which would most likely catch all actions. Similar to the percentage you can choose when to start and end the detection i.e. 30 seconds into the video and all the until 30 seconds from the end.
Saving Settings and Enabling Previews
All settings are saved automatically as you modify them. Before you try out the application, enable the thumbnail previews by clicking the About menu, Settings and then enabling Show Screenshots During AI Detection. This will show you what AI is doing whilst its running, it is turned off by default to save memory use.
2: Selecting Videos to Scan and Starting
Now you’re ready to try pornspective.ai out. One the same configuration page you’ll see the option to Add Files. Add some video files by browsing for them on your computer or network. Once you’ve added some files, go to the Home Screen (“house icon”) and click Start. Note, here you can also add an entire folder of videos, however for the moment just play with a handful.
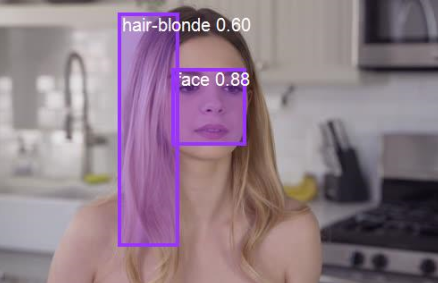
Once Started you’ll see AI begin the thumbnailing process. This will take thumbnails at regular intervals depending on what you’ve set. Once all thumbnails have been taken the AI detection begins. You’ll see any found objects, actions or appearances are highlighted in new images in the preview. The entire set of thumbnails are processed and the AI results captured. It will then continue to the next video in the queue.
3: Reviewing the Results
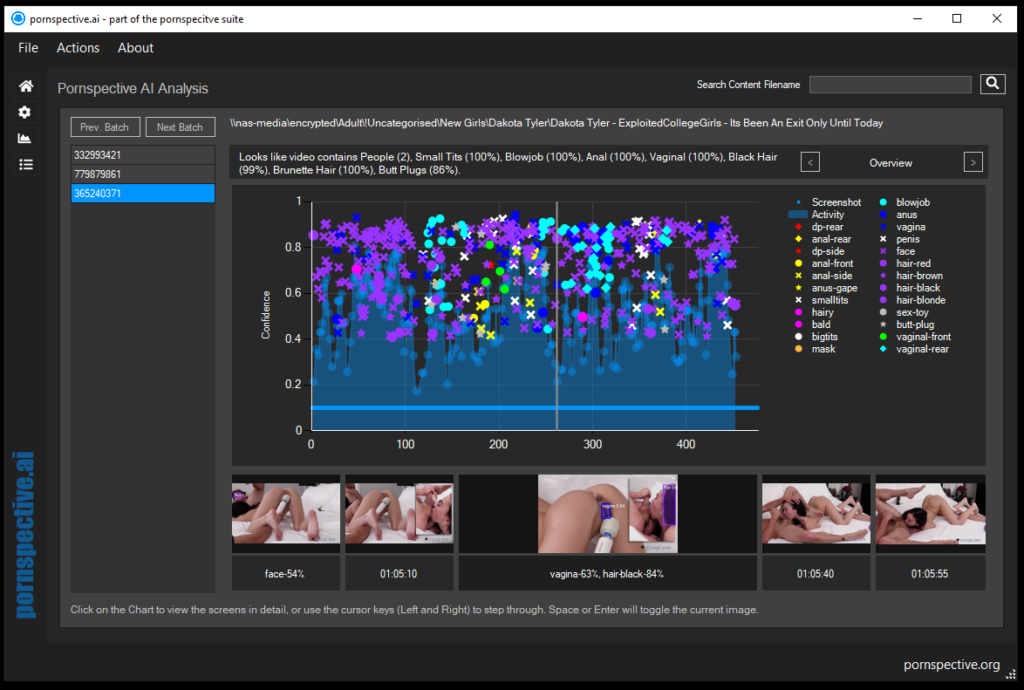
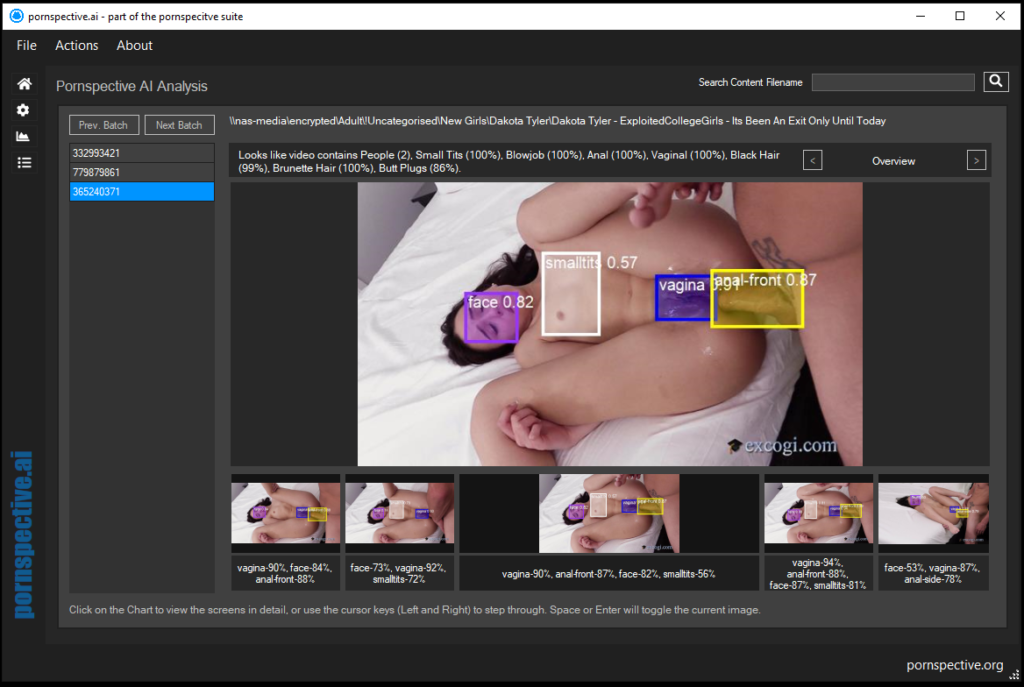
Either once your batch of videos has processed or during the processing you will see completed videos appear in the analysis section. Click the graph icon on the left which will show you a list of jobs (all with a random batch number). Click each to reveal an AI “footprint” of the scene, the chart then shows what has been identified and with what confidence.
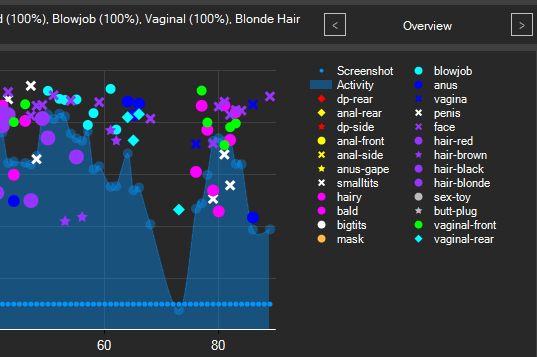
Above the chart you’ll see a summary of what was found with the “Looks like the video contains …” message. This will list out the AI detection items and the confidence level for each. If you hover over the chart with your cursor you’ll see the screenshots shown for the position, this will highlight visually what was found. The Overview screen will look very busy if lots of things are found. Use the arrows to the right and left of Overview to cycle through the items and see clearer how they’ve been detected with the threshold of what was counted and what wasn’t counted.
4: Exporting Results
If you want to simply use v2 and pornspective.ai completely separately then you can export results from pornspective.ai as a file and import them into v2. No images are exported, just the results as that’s all v2 needs. If v2 contains the same videos as you’ve scanned then they’ll be tagged on import. Head to the home page and click Export, give the file a name and click Save. You’re done.
Using with pornspective.v2
The detection using AI is all very impressive and pretty, but let’s put it to some use. Finally we’ll show you how to use pornsepctive.ai with pornspective.v2
1: The Manual Import/Export way
Before the system can apply automatic tags you’ll need to provide the AI mappings. These are essentially linking the AI output such as BJ, Anal, Hairy, Bald etc to your tags. If you haven’t got tags that represent these items then you can either decide to not map them or if you want to map them then you should create those tags in pornspective.v2 ready to link.
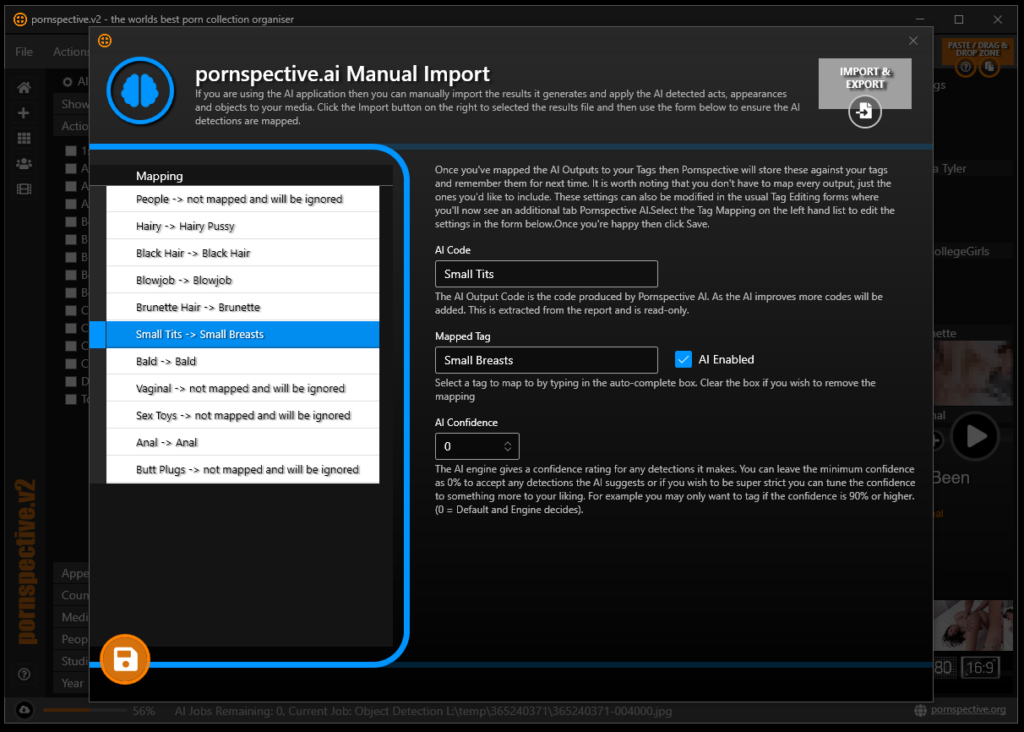


This step is introduced when you import your results. However first of all you’ll need to enable AI within pornspective.v2. Simply click About menu, Local Settings and then click the AI (“brain”) icon. At this stage just enable the pornspective.ai features. (We’ll discuss the service later). Save the settings. Now you can import your results by click the Actions menu, where you’ll now see a pornspective.ai menu item at the bottom, within here is Import AI Detections. Click this to show the import tool. Here you can now click the Import icon at the top right and browse for your export file.
Once loaded you’ll see a series of detections that are present in your export file, for each you need to decide to map or ignore them. If you wish to map them then click the Mapping item and then on the right panel you’ll see a box called Mapped Tag, here you can type the Tag you wish to link to the mapping. Make sure you also click AI Enabled next to the box. Finally you can choose a confidence to accept the mapping i.e. don’t map to Anal unless you are 99% sure. Leave it as 0% if you trust the AI detection to get things right. You can play with this setting when fine tuning.
Once you’ve mapped the items you wish to auto tag then click Save. You’ll then be show the videos that pornspective.ai has found new tags for. By default they are all selected, but you can choose to unselect some if you wish. Finally click the check button at the bottom right to apply all these new tags AI has found. Job done.
2: The Remoting Way
It is recommended you start with the Import/Export way just to get a feel for how it works. However once confident you can truly connect the two apps together to work much more seamlessly. To enable the remoting service you’ll first need to Start the service in pornspecive.ai. So in pornspective.ai click the Home page and you’ll see a button at the top right called Start Service. Click this. You’ll likely get a firewall message at this point as it wants to open a port to allow the removing to work. Once you’ve allowed for the port to be open then a message will appear to say the service has started.
Head over to pornspective.v2 now and enable the service. To do this, you’ll need to go to About -> Local Settings and click the AI (“brain”) icon. Here you’ll see an option to enable the service. Check this option and enter the IP address or hostname of the machine that pornspective.ai is installed on. If its the same machine as pornspective.v2 then you can simply leave this as localhost. Keep the port number to 9000 and click Test Connection. This will confirm that all is working, if you have an issue then check to see the pornspective.ai service has started and that you’ve enable the firewall rules.
Now you’ve enabled the service you can do several things from pornspective.v2. Under the Actions -> pornspective.ai menu you’ll see AI Mappings options. This allows you to map tags in the same way as you did when importing, however this will give the comprehensive list of mapping items to map.
From the same menu, you can also check for new AI Detections. This basically gets v2 to check with pornspective.ai if there are any results in the queue waiting to be applied in v2. This is useful if you’ve left AI running overnight and want to bring over the results.
When using v2, on the content preview you will now see an AI icon. This allows you to send the video off to be scanned by AI and return the results once it’s done. All of this will be done seamlessly and results applied whilst you continue to use v2.
Finally one last point, on the Actions -> pornspective.ai menu you’ll also see the function to remove all AI tags from content. This will prompt if you are sure you want to do this, however I have added this just in case you don’t like the AI tagging results and find that it is not accurate for your needs.